Creating the Bolt Compiler: Part 8
A Complete Guide to LLVM for Programming Language Creators
December 24, 2020
12 min read
Update: this post has now taken off on Hacker News and Reddit. Thank you all!
Who’s this tutorial for?
This series of compiler tutorials is for people who don’t just want to create a toy language. You want objects. You want polymorphism. You want concurrency. You want garbage collection. Wait you don’t want GC? Okay, no worries, we won’t do that :P
If you’ve just joined the series at this stage, here’s a quick recap. We’re designing a Java-esque concurrent object-oriented programming language Bolt. We’ve gone through the compiler frontend, where we’ve done the parsing, type-checking and dataflow analysis. We’ve desugared our language to get it ready for LLVM - the main takeaway is that objects have been desugared to structs, and their methods desugared to functions.
Learn about LLVM and you’ll be the envy of your friends. Rust uses LLVM for its backend, so it must be cool. You’ll beat them on all those performance benchmarks, without having to hand-optimise your code or write machine assembly code. Shhhh, I won’t tell them.
Just give me the code!
All the code can be found in the Bolt compiler repository.
The C++ class definitions for our desugared representation (we call this Bolt IR) can be found in deserialise_ir folder. The code for this post (the LLVM IR generation) can be found in the llvm_ir_codegen folder. The repo uses the Visitor design pattern and ample use of std::unique_ptr to make memory management easier.
To cut through the boilerplate, to find out how to generate LLVM IR for a particular language expression, search for the IRCodegenVisitor::codegen method that takes in the corresponding ExprIR object. e.g. for if-else statements:
Value *IRCodegenVisitor::codegen(const ExprIfElseIR &expr) {... // this is the LLVM IR generation}
Understanding LLVM IR
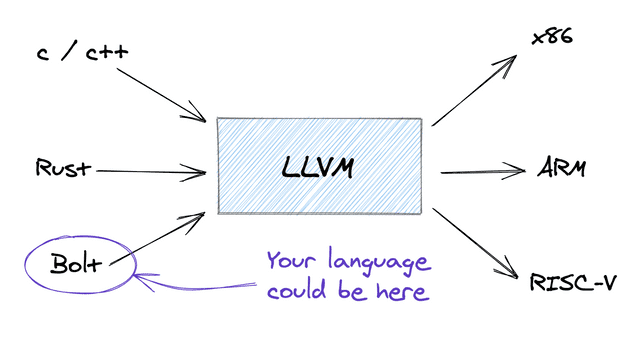
LLVM sits in the middle-end of our compiler, after we’ve desugared our language features, but before the backends that target specific machine architectures (x86, ARM etc.)
LLVM’s IR is pretty low-level, it can’t contain language features present in some languages but not others (e.g. classes are present in C++ but not C). If you’ve come across instruction sets before, LLVM IR is a RISC instruction set.
The upshot of it is that LLVM IR looks like a more readable form of assembly. As LLVM IR is machine independent, we don’t need to worry about the number of registers, size of datatypes, calling conventions or other machine-specific details.
So instead of a fixed number of physical registers, in LLVM IR we have an unlimited set of virtual registers (labelled %0, %1, %2, %3… we can write and read from. It’s the backend’s job to map from virtual to physical registers.
And rather than allocating specific sizes of datatypes, we retain types in LLVM IR. Again, the backend will take this type information and map it to the size of the datatype. LLVM has types for different sizes of ints and floats, e.g. int32, int8, int1 etc. It also has derived types: like pointer types, array types, struct types, function types. To find out more, check out the Type documentation.
Now, built into LLVM are a set of optimisations we can run over the LLVM IR e.g. dead-code elimination, function inlining, common subexpression elimination etc. The details of these algorithms are irrelevant: LLVM implements them for us.
Our side of the bargain is that we write LLVM IR in Static Single Assignment (SSA) form, as SSA form makes life easier for optimisation writers. SSA form sounds fancy, but it just means we define variables before use and assign to variables only once. In SSA form, we cannot reassign to a variable, e.g. x = x+1; instead we assign to a fresh variable each time (x2 = x1 + 1).
So in short: LLVM IR looks like assembly with types, minus the messy machine-specific details. LLVM IR must be in SSA form, which makes it easier to optimise. Let’s look at an example!
An example: Factorial
Let’s look at a simple factorial function in our language Bolt:
function int factorial(int n){if (n==0) {1}else{n * factorial(n - 1)}}
The corresponding LLVM IR is as follows:
define i32 @factorial(i32) {entry:%eq = icmp eq i32 %0, 0 // n == 0br i1 %eq, label %then, label %elsethen: ; preds = %entrybr label %ifcontelse: ; preds = %entry%sub = sub i32 %0, 1 // n - 1%2 = call i32 @factorial(i32 %sub) // factorial(n-1)%mult = mul i32 %0, %2 // n * factorial(n-1)br label %ifcontifcont: ; preds = %else, %then%iftmp = phi i32 [ 1, %then ], [ %mult, %else ]ret i32 %iftmp}
Note the .ll extension is for human-readable LLVM IR output. There’s also .bc for bit-code, a more compact machine representation of LLVM IR.
We can walk through this IR in 4 levels of detail:
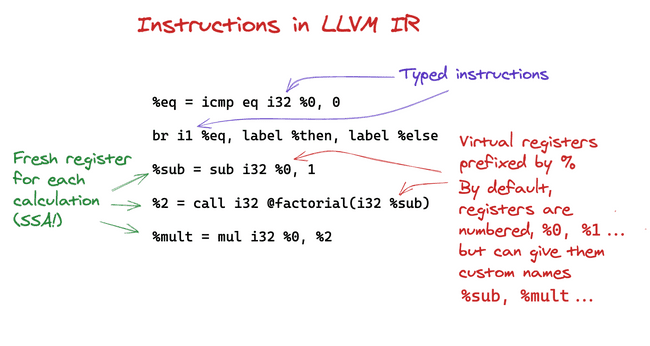
At the Instruction Level:
Notice how LLVM IR contains assembly instructions like br and icmp, but abstracts the machine-specific messy details of function calling conventions with a single call instruction.
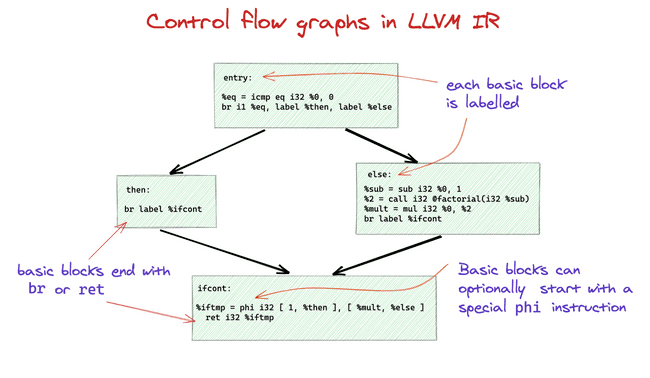
At the Control Flow Graph Level:
If we take a step back, you can see the IR defines the control flow graph of the program. IR instructions are grouped into labeled basic blocks, and the preds labels for each block represent incoming edges to that block. e.g. the ifcont basic block has predecessors then and else:
At this point, I’m going to assume you have come across Control Flow Graphs and basic blocks. We introduced Control Flow Graphs in a previous post in the series, where we used them to perform different dataflow analyses on the program. I’d recommend you go and check the CFG section of that dataflow analysis post now. I’ll wait here :)
The phi instruction represents conditional assignment: assigning different values depending on which preceding basic block we’ve just come from. It is of the form phi type [val1, predecessor1], [val2, predecessor2], ... In the example above, we set %iftmp to 1 if we’ve come from the then block, and %mult if we’ve come from the else block. Phi nodes must be at the start of a block, and include one entry for each predecessor.
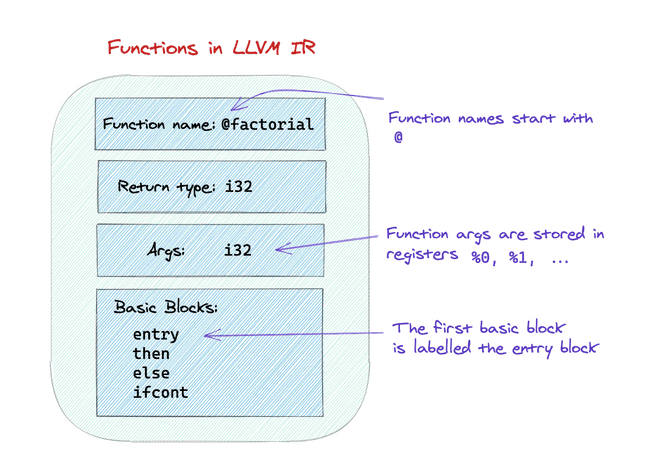
At the Function Level:
Taking another step back, the overall structure of a function in LLVM IR is as follows:
At the Module Level:
An LLVM module contains all the information associated with a program file. (For multi-file programs, we’d link together their corresponding modules.)
Our factorial function is just one function definition in our module. If we want to execute the program, e.g. to compute factorial(10) we need to define a
main function, which will be the entrypoint for our program’s execution. The main function’s signature is a hangover from C (we return 0 to indicate successful execution):
// a C main functionint main(){factorial(10);return 0;}
We specify that we want to compile for an Intel Macbook Pro in the module target info:
source_filename = "Module"target triple = "x86_64-apple-darwin18.7.0"...define i32 @factorial(i32) {...}define i32 @main() {entry:%0 = call i32 @factorial(i32 10)ret i32 0}
The LLVM API: Key Concepts
Now we’ve got the basics of LLVM IR down, let’s introduce the LLVM API. We’ll go through the key concepts, then introduce more of the API as we explore LLVM IR further.
LLVM defines a whole host of classes that map to the concepts we’ve talked about.
ValueModuleTypeFunctionBasicBlockBranchInst…
These are all in the namespace llvm. In the Bolt repo, I chose to make this namespacing explicit by referring to them as llvm::Value, llvm::Module etc.)
Most of the LLVM API is quite mechanical. Now you’ve seen the diagrams that define modules, functions and basic blocks, the relationship between their corresponding classes in the API falls out nicely. You can query a Module object to get a list of its Function objects, and query a Function to get the list of its BasicBlocks, and the other way round: you can query a BasicBlock to get its parent Function object.
Value is the base class for any value computed by the program. This could be a function (Function subclasses Value), a basic block (BasicBlock also subclasses Value), an instruction, or the result of an intermediate computation.
Each of the expression codegen methods returns a Value *: the result of executing that expression. You can think of these codegen methods as generating the IR for that expression and the Value * representing the virtual register containing the expression’s result.
virtual Value *codegen(const ExprIntegerIR &expr) override;virtual Value *codegen(const ExprBooleanIR &expr) override;virtual Value *codegen(const ExprIdentifierIR &expr) override;virtual Value *codegen(const ExprConstructorIR &expr) override;virtual Value *codegen(const ExprLetIR &expr) override;virtual Value *codegen(const ExprAssignIR &expr) override;
How do we generate the IR for these expressions? We create a unique Context object to tie our whole code generation together. We use this Context to get access to core LLVM data structures e.g LLVM modules and IRBuilder objects.
We’ll use the context to create just one module, which we’ll imaginatively name "Module".
context = make_unique<LLVMContext>();builder = std::unique_ptr<IRBuilder<>>(new IRBuilder<>(*context));module = make_unique<Module>("Module", *context);
IRBuilder
We use the IRBuilder object to incrementally build up our IR. It is intuitively the equivalent of a file pointer when reading/writing a file - it carries around implicit state, e.g. the last instruction added, the basic block of that instruction etc. Like moving around a file pointer, you can set the builder object to insert instructions at the end of a particular Basic Block with the SetInsertPoint(BasicBlock *TheBB) method. Likewise you can get the current basic block with GetInsertBlock().
The builder object has Create___() methods for each of the IR instructions. e.g. CreateLoad for a load instruction , CreateSub, CreateFSub for integer and floating point sub instructions respectively etc. Some Create__() instructions take an optional Twine argument: this is used to give the result’s register a custom name. e.g. iftmp is the twine for the following instruction:
%iftmp = phi i32 [ 1, %then ], [ %mult, %else]
Use the IRBuilder docs to find the method corresponding to your instruction.
Types and Constants
We don’t directly construct these, instead we get__() them from their corresponding classes. (LLVM keeps track of how a unique instance of each type / constant class is used).
For example, we getSigned to get a constant signed integer of a particular type and value, and getInt32Ty to get the int32 type.
Value *IRCodegenVisitor::codegen(const ExprIntegerIR &expr) {return ConstantInt::getSigned((Type::getInt32Ty(*context)),expr.val);};
Function types are similar: we can use FunctionType::get. Function types consist of the return type, an array of the types of the params and whether the function is variadic:
FunctionType::get(returnType, paramTypes, false /* doesn't have variadic args */);
Type declarations
We can declare our own custom struct types.
e.g. a Tree with a int value, and pointers to left and right subtrees:
%Tree = type {i32, Tree*, Tree* }
Defining a custom struct type is a two-stage process.
First we create the type with that name. This adds it to the module’s symbol table. This type is opaque: we can now reference in other type declarations e.g. function types, or other struct types, but we can’t create structs of that type (as we don’t know what’s in it).
StructType *treeType = StructType::create(*context, StringRef("Tree"));
LLVM boxes up strings and arrays using StringRef and ArrayRef. You can directly pass in a string where the docs require a StringRef, but I choose to make this StringRef explicit above.
The second step is to specify an array of types that go in the struct body. Note since we’ve defined the opaque Tree type, we can get a Tree * type using the Tree type’s getPointerTo() method.
treeType->setBody(ArrayRef<Type *>({Type::getInt32Ty(*context);, treeType->getPointerTo(), treeType->getPointerTo()}));
So if you have custom struct types referring to other custom struct types in their bodies, the best approach is to declare all of the opaque custom struct types, then fill in each of the structs’ bodies.
void IRCodegenVisitor::codegenClasses(const std::vector<std::unique_ptr<ClassIR>> &classes) {// create (opaque) struct types for each of the classesfor (auto &currClass : classes) {StructType::create(*context, StringRef(currClass->className));}// fill in struct bodiesfor (auto &currClass : classes) {std::vector<Type *> bodyTypes;for (auto &field : currClass->fields) {// add field typebodyTypes.push_back(field->codegen(*this));}// get opaque class struct type from module symbol tableStructType *classType =module->getTypeByName(StringRef(currClass->className));classType->setBody(ArrayRef<Type *>(bodyTypes));}
### Functions
Functions operate in a similar two step process:
- Define the function prototypes
- Fill in their function bodies (skip this if you’re linking in an external function!)
The function prototype consists of the function name, the function type, the “linkage” information and the module whose symbol table we want to add the function to. We choose External linkage - this means the function prototype is viewable externally. This means that we can link in an external function definition (e.g. if using a library function), or expose our function definition in another module. You can see the full enum of linkage options here.
Function::Create(functionType, Function::ExternalLinkage,function->functionName, module.get());
To generate the function definition we just need to use the API to construct the control flow graph we discussed in our factorial example:
void IRCodegenVisitor::codegenFunctionDefn(const FunctionIR &function) {// look up function in module symbol definitionFunction *llvmFun =module->getFunction(function.functionName);BasicBlock *entryBasicBlock =BasicBlock::Create(*context, "entry", llvmFun);builder->SetInsertPoint(entryBasicBlock);...
The official Kaleidoscope tutorial has an excellent explanation of how to construct a control flow graph for an if-else statement.
More LLVM IR Concepts
Now we’ve covered the basics of LLVM IR and the API, we’re going to look at some more LLVM IR concepts and introduce the corresponding API function calls alongside them.
Stack allocation
There are two ways we can store values in local variables in LLVM IR. We’ve seen the first: assignment to virtual registers. The second is dynamic memory allocation to the stack using the alloca instruction. Whilst we can store ints, floats and pointers to either the stack or virtual registers, aggregate datatypes, like structs and arrays, don’t fit in registers so have to be stored on the stack.
Yes, you read that right. Unlike most programming language memory models, where we use the heap for dynamic memory allocation, in LLVM we just have a stack.
Heaps are not provided by LLVM - they are a library feature. For single-threaded applications, stack allocation is sufficient. We’ll talk about the need for a global heap in multi-threaded programs in the next post (where we extend Bolt to support concurrency).
We’ve seen struct types e.g. {i32, i1, i32}. Array types are of the form [num_elems x elem_type]. Note num_elems is a constant - you need to provide this when generating the IR, not at runtime. So [3 x int32] is valid but [n x int32] is not.
We give alloca a type and it allocates a block of memory on the stack and returns a pointer to it, which we can store in a register. We can use this pointer to load and store values from/onto the stack.
For example, storing a 32-bit int on the stack:
%p = alloca i32 // store i32* pointer in %pstore i32 1, i32* %p%1 = load i32, i32* %p
The corresponding builder instructions are… you guessed it CreateAlloca, CreateLoad, CreateStore.
CreateAlloca returns a special subclass of Value *: an AllocaInst *:
AllocaInst *ptr = builder->CreateAlloca(Type::getInt32Ty(*context),/* Twine */ "p");// AllocaInst has additional methods e.g. to query typeptr->getAllocatedType(); // returns i32builder->CreateLoad(ptr);builder->CreateStore(someVal, ptr);
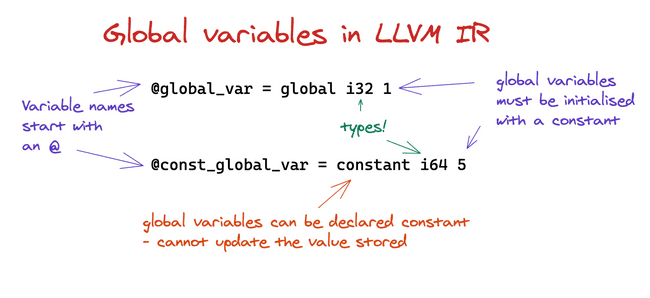
Global variables
Just as we alloca local variables on a stack, we can create global variables and load from them and store to them.
Global variables are declared at the start of a module, and are part of the module symbol table.
We can use the module object to create named global variables, and to query them.
module->getOrInsertGlobal(globalVarName, globalVarType);...GlobalVariable *globalVar = module->getNamedGlobal(globalVarName);
Global variables must be initialised with a constant value (not a variable):
globalVar->setInitializer(initValue);
Alternatively we can do this in one command using the GlobalVariable constructor:
GlobalVariable *globalVar = new GlobalVariable(module, globalVarType, /*isConstant*/ false,GlobalValue::ExternalLinkage, initValue, globalVarName)
As before we can load and store:
builder->CreateLoad(globalVar);builder->CreateStore(someVal, globalVar); // not for consts!
GEPs
We get a base pointer to the aggregate type (array / struct) on the stack or in global memory, but what if we want a pointer to a specific element? We’d need to find the pointer offset of that element within the aggregate, and then add this to the base pointer to get the address of that element. Calculating the pointer offset is machine-specific e.g. depends on the size of the datatypes, the struct padding etc.
The Get Element Pointer (GEP) instruction is an instruction to apply the pointer offset to the base pointer and return the resultant pointer.
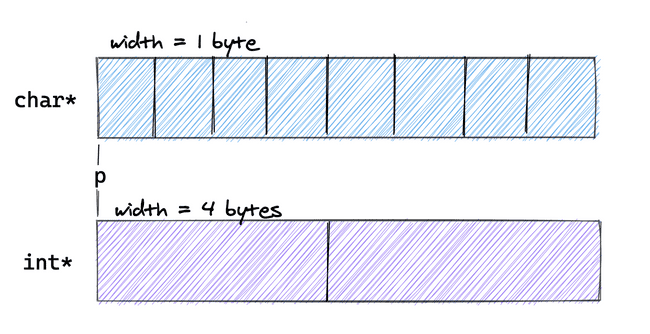
Consider two arrays starting at p. Following C convention, we can represent a pointer to that array as char* or int*.
Below we show the GEP instruction to calculate the pointer p+1 in each of the arrays:
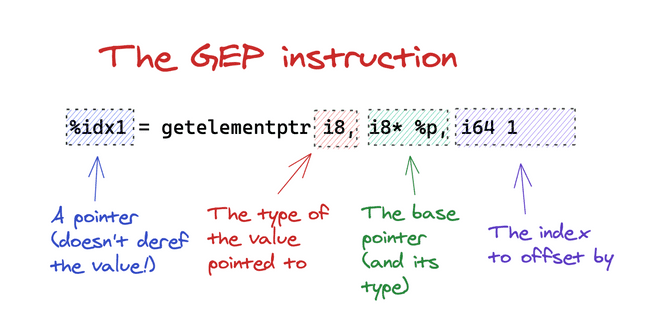
// char = 8 bit integer = i8%idx1 = getelementptr i8, i8* %p, i64 1 // p + 1 for char*%idx2 = getelementptr i32, i32* %p, i64 1 // p + 1 for int*
This GEP instruction is a bit of a mouthful so here’s a breakdown:
This i64 1 index adds multiples of the base type to the base pointer. p+1 for i8 would add 1 byte, whereas as p+1 for i32 would add 4 bytes to p. If the index was i64 0 we’d return p itself.
The LLVM API instruction for creating a GEP is… CreateGEP.
Value *ptr = builder->CreateGEP(baseType, basePtr, arrayofIndices);
Wait? Array of indices? Yes, the GEP instruction can have multiple indices passed to it. We’ve looked at a simple example where we only needed one index.
Before we look at the case where we pass multiple indices, I want to reiterate the purpose of this first index:
A pointer of type Foo * can represent in C the base pointer of an array of type Foo. The first index adds multiples of this base type Foo to traverse this array.
GEPS with Structs
Okay, now let’s look at structs. So take a struct of type Foo:
%Foo = type { i32, [4 x i32], i32}
We want to index specific fields in the struct. The natural way would be to label them field 0, 1 and 2. We can access field 2 by passing this into the GEP instruction as another index.
%ThirdFieldPtr = getelementptr %Foo, %Foo* %ptr, i64 0, i64 2
The returned pointer is then calculated as: ptr + 0 * (size of Foo) + offset 2 * (fields of Foo).
For structs, you’ll likely always pass the first index as 0. The biggest confusion with GEPs is that this 0 can seem redundant, as we want the field 2, so why are we passing a 0 index first? Hopefully you can see from the first example why we need that 0. Think of it as passing to GEP the base pointer of an implicit Foo array of size 1.
To avoid the confusion, LLVM has a special CreateStructGEP instruction that asks only for field index (this is the CreateGEP instruction with a 0 added for you):
Value *thirdFieldPtr = builder->CreateStructGEP(baseStructType, basePtr, fieldIndex);
The more nested our aggregate structure, the more indices we can provide. E.g. for element index 2 of Foo’s second field (the 4 element int array):
getelementptr %Foo, %Foo* %ptr, i64 0, i64 1, i64 2
The pointer returned is: ptr + 0 * (size of Foo) + offset 1 * (field of Foo) + offset 2 * (elems of array).
(In terms of the corresponding API, we’d use CreateGEP and pass the array {0,1,2}.)
A Good talk that explains GEP well.
mem2reg
If you remember, LLVM IR must be written in SSA form. But what happens if the Bolt source program we’re trying to map to LLVM IR is not in SSA form?
For example, if we’re reassigning x:
let x = 1x = x + 1
One option would be for us to rewrite the program in SSA form in an earlier compiler stage. Every time we reassign a variable, we’d have to create a fresh variable. We’d also have to introduce phi nodes for conditional statements. For our example, this is straightforward, but in general this extra rewrite is a pain we would rather not deal with.
// Valid SSA: assign fresh variableslet x1 = 1x2 = x1 + 1
We can use pointers to avoid assigning fresh variables. Note here we aren’t reassigning the pointer x, just updating the value it pointed to. So this is valid SSA.
// valid SSA: use a pointer and update the value it points tolet x = &1;*x = *x + 1
This switch to pointers is a much easier transformation than variable renaming. It also has a really nice LLVM IR equivalent: allocating stack memory (and manipulating the pointers to the stack) instead of reading from registers.
So whenever we declare a local variable, we use alloca to get a pointer to freshly allocated stack space. We use the load and store instructions to read and update the value pointed to by the pointer:
%x = alloca i32store i32 1, i32* %x%1 = load i32, i32* %x%2 = add i32 %1, 1store i32 %2, i32* %x
Let’s revisit the LLVM IR if we were to rewrite the Bolt program to use fresh variables. It’s only 2 instructions, compared to the 5 instructions needed if using the stack. Moreover, we avoid the expensive load and store memory access instructions.
%x1 = 1%x2 = add i32 %x1, 1 // let x2 = x1 + 1
So while we’ve made our lives easier as compiler writers by avoiding a rewrite-to-SSA pass, this has come at the expense of performance.
Happily, LLVM lets us have our cake and eat it.
LLVM provides a mem2reg optimisation that optimises stack memory accesses into register accesses. We just need to ensure we declare all our allocas for local variables in the entry basic block for the function.
How do we do this if the local variable declaration occurs midway through the function, in another block? Let’s look at an example:
// BOLT variable declarationlet x : int = someVal;// translated to LLVM IR%x = alloca i32store i32 someVal, i32* %x
We can actually move the alloca. It doesn’t matter where we allocate the stack space so long as it is allocated before use. So let’s write the alloca at the very start of the parent function this local variable declaration occurs.
How do we do this in the API? Well, remember the analogy of the builder being like a file pointer? We can have multiple file pointers pointing to different places in the file. Likewise, we instantiate a new IRBuilder to point to the start of the entry basic block of the parent function, and insert the alloca instructions using that builder.
Function *parentFunction = builder->GetInsertBlock()->getParent();// create temp builder to point to start of functionIRBuilder<> TmpBuilder(&(parentFunction->getEntryBlock()),parentFunction->getEntryBlock().begin());// .begin() inserts this alloca at beginning of blockAllocaInst *var = TmpBuilder.CreateAlloca(boundVal->getType());// resume our current position by using orig. builderbuilder->CreateStore(someVal, var);
LLVM Optimisations
The API makes it really easy to add passes. We create a functionPassManager, add the optimisation passes we’d like, and then initialise the manager.
std::unique_ptr<legacy::FunctionPassManager> functionPassManager =make_unique<legacy::FunctionPassManager>(module.get());// Promote allocas to registers.functionPassManager->add(createPromoteMemoryToRegisterPass());// Do simple "peephole" optimizationsfunctionPassManager->add(createInstructionCombiningPass());// Reassociate expressions.functionPassManager->add(createReassociatePass());// Eliminate Common SubExpressions.functionPassManager->add(createGVNPass());// Simplify the control flow graph (deleting unreachable blocks etc).functionPassManager->add(createCFGSimplificationPass());functionPassManager->doInitialization();
We run this on each of the program’s functions:
for (auto &function : functions) {Function *llvmFun =module->getFunction(StringRef(function->functionName));functionPassManager->run(*llvmFun);}Function *llvmMainFun = module->getFunction(StringRef("main"));functionPassManager->run(*llvmMainFun);
In particular, let’s look at the the factorial LLVM IR output by our Bolt compiler before and after. You can find them in the repo:
define i32 @factorial(i32) {entry:%n = alloca i32store i32 %0, i32* %n%1 = load i32, i32* %n%eq = icmp eq i32 %1, 0br i1 %eq, label %then, label %elsethen: ; preds = %entrybr label %ifcontelse: ; preds = %entry%2 = load i32, i32* %n%3 = load i32, i32* %n%sub = sub i32 %3, 1%4 = call i32 @factorial(i32 %sub)%mult = mul i32 %2, %4br label %ifcontifcont: ; preds = %else, %then%iftmp = phi i32 [ 1, %then ], [ %mult, %else ]ret i32 %iftmp}
And the optimised version:
define i32 @factorial(i32) {entry:%eq = icmp eq i32 %0, 0br i1 %eq, label %ifcont, label %elseelse: ; preds = %entry%sub = add i32 %0, -1%1 = call i32 @factorial(i32 %sub)%mult = mul i32 %1, %0br label %ifcontifcont: ; preds = %entry, %else%iftmp = phi i32 [ %mult, %else ], [ 1, %entry ]ret i32 %iftmp}
Notice how we’ve actually got rid of the alloca and the associated load and store instructions, and also removed the then basic block!
Wrap up
This last example shows you the power of LLVM and its optimisations. You can find the top-level code that runs the LLVM code generation and optimisation in the main.cc file in the Bolt repository.
In the next few posts we’ll be looked at some more advanced language features: generics, inheritance and method overriding and concurrency! Stay tuned for when they come out!
