Creating the Bolt Compiler: Part 3
Writing a Lexer and Parser using OCamllex and Menhir
June 01, 2020
10 min read
Last updated: February 05, 2022

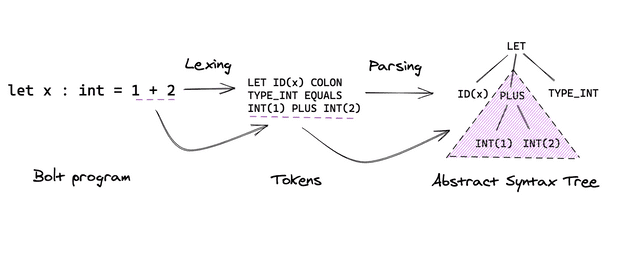
We can’t directly reason about our Bolt program, as it is just an unstructured stream of characters. Lexing and parsing pre-processes them into a structured representation that we can perform type-checking on in later stages of the compiler.
Lexing Tokens
The individual characters don’t mean much, so first we need to split the stream into tokens (which are analogous to “words” in sentences). These tokens assign meaning: is this group of characters a specific keyword in our language (if int class) or is it an identifier (banana)?
Tokens also reduce our problem space substantially: they standardise the representation. We no longer have to worry about whitespace (x == 0 and x== 0 both become IDENTIFIER(x) EQUAL EQUAL INT(0)) and we can filter out comments from our source code.
How do we split our stream of characters into tokens? We pattern-match. Under the hood, you could think of this as a massive case analysis. However, since the case analysis is ambiguous (multiple tokens could correspond to the same set of characters) we have two additional rules we have to consider:
- Priority order: We order our tokens by priority. E.g. we want
intto be matched as a keyword, not a variable name. - Longest pattern match: we read
elseas a keyword rather than splitting it into two variable nameselandse. Likewise,intMaxis a variable name: not to be read asintandMax.
Here’s a really simple lexer that recognises the keywords “IN”, “INT” and identifiers (variable / function names), and tokens are separating by spaces. Notice we check for the IN case before the “default” variable case (priority order):
// this is pseudocode for a simplified lexercharsSeenSoFar = "in"while(streamHasMoreCharacters){nextChar = readCharFromStream()if(nextChar == " "){// we've found a tokenswitch(charsSeenSoFar):case "in":output "IN"breakcase: "int":output "INT"breakdefault:output ID(charsSeenSoFar)// not "in" or "int" keywords so must be an identifiercharSeenSoFar= "" // start matching another token} else {// longest match: we'll try to pattern match "int" next iterationcharSeenSoFar += nextChar}}
OCamllex
Whilst you could hand-code the pattern-matching pseudocode, in practice it is quite finicky especially as our language gets bigger. Instead, we’re going to use the lexer generator OCamllex. OCamllex is an OCaml library we can use in our compiler by adding it as a dependency to our Dune build file.
(ocamllex lexer)
The specification for the lexer is in the lexer.mll file (note the .mll file extension).
OCaml Header
To start with, we optionally provide a header containing OCaml helper code (enclosed in curly braces). We define a SyntaxError exception and a function nextline, which moves the pointer to the next line of the lexbuf buffer that the program is read into:
{open Lexingopen Parserexception SyntaxError of stringlet next_line lexbuf =let pos = lexbuf.lex_curr_p inlexbuf.lex_curr_p <-{ pos with pos_bol = lexbuf.lex_curr_pos;pos_lnum = pos.pos_lnum + 1}}
Helper Regexes
Next, we need to specify the regular expressions we’re using to match the tokens. For most of the tokens, this is a simple string e.g. true for token TRUE. However, other tokens have more complex regexes e.g. for integers and identifiers (below). OCamllex’s regex syntax is like most regex libraries;
(* Define helper regexes *)let digit = ['0'-'9']let alpha = ['a'-'z' 'A'-'Z']let int = '-'? digit+ (* regex for integers *)let id = (alpha) (alpha|digit|'_')* (* regex for identifier *)let whitespace = [' ' '\t']+let newline = '\r' | '\n' | "\r\n"
Lexing Rules
Next, we need to specify rules for OCamllex to scan the input. Each rule is specified in a pattern-matching format, and we specify the regexes in order of priority (highest priority first):
rule <rule_name> = parse| <regex> { TOKEN_NAME } (* output a token *)| <regex> { ... } (* or execute other code *)and <another_rule> = parse| ...
The rules are recursive: once it matches a token, it calls itself to start over and match the next token. Multiple rules are mutually recursive, that is we can recursively call each rule in the other’s definition. Having multiple rules is useful if you want to treat the character stream differently in different cases.
For example, we want our main rule to read tokens. However, we want to treat comments differently, not emitting any tokens until we reach the end of the comment. Another case are strings in Bolt: we want to treat the characters we are reading as part of a string, not as matching a token. These cases can all be seen in the following Bolt code:
let x = 4 // here is a comment/* This is a multi-linecomment*/printf("x's value is %d", x)
Now we have our requirements for our lexer, we can define the rules in our OCamllex specification file. The key points are:
- We have 4 rules:
read_token,read_single_line_comment,read_multi_line_commentandread_string. - We need to handle
eofexplicitly (this signifies the end of file) and include a catch-all case_to match all other regexes. - We use
Lexing.lexeme lexbufto get the string matched by the regex. - For
read_string, we create another buffer to store the characters into: we don’t useLexing.lexeme lexbufas we want to explicitly handle escaped characters.Buffer.create 17allocates a resizable buffer that initially has a size of 17 bytes. - We use
raise SyntaxErrorfor error-handling (unexpected input characters). - When reading tokens, we skip over whitespace by calling
read_token lexbufrather than emitting a token. Likewise, for a new line we call our helper functionnext_lineto skip over the new line character.
rule read_token =parse| "(" { LPAREN }... (* keywords and other characters' regexes *)| "printf" {PRINTF }| whitespace { read_token lexbuf }| "//" { single_line_comment lexbuf (* use our comment rule for rest of line *) }| "/*" { multi_line_comment lexbuf }| int { INT (int_of_string (Lexing.lexeme lexbuf))}| id { ID (Lexing.lexeme lexbuf) }| '"' { read_string (Buffer.create 17) lexbuf }| newline { next_line lexbuf; read_token lexbuf }| eof { EOF }| _ {raise (SyntaxError ("Lexer - Illegal character: " ^ Lexing.lexeme lexbuf)) }and read_single_line_comment = parse| newline { next_line lexbuf; read_token lexbuf }| eof { EOF }| _ { read_single_line_comment lexbuf }and read_multi_line_comment = parse| "*/" { read_token lexbuf }| newline { next_line lexbuf; read_multi_line_comment lexbuf }| eof { raise (SyntaxError ("Lexer - Unexpected EOF - please terminate your comment.")) }| _ { read_multi_line_comment lexbuf }and read_string buf = parse| '"' { STRING (Buffer.contents buf) }| '\\' 'n' { Buffer.add_char buf '\n'; read_string buf lexbuf }... (* Other regexes to handle escaping special characters *)| [^ '"' '\\']+{ Buffer.add_string buf (Lexing.lexeme lexbuf);read_string buf lexbuf}| _ { raise (SyntaxError ("Illegal string character: " ^ Lexing.lexeme lexbuf)) }| eof { raise (SyntaxError ("String is not terminated")) }
Generated OCamllex output
OCamllex generates a Lexer module from the lexer.mll specification, from which you can call Lexer.read_token or any of the other rules, as well as the helper functions defined in the header. If you’re curious, after running make build you can see the generated module in lexer.ml in the _build folder - it’s just a massive pattern-match statement:
let rec read_token lexbuf =__ocaml_lex_read_token_rec lexbuf 0and __ocaml_lex_read_token_rec lexbuf __ocaml_lex_state =match Lexing.engine __ocaml_lex_tables __ocaml_lex_state lexbufwith| 0 -># 39 "src/frontend/parsing/lexer.mll"( LPAREN )# 2603 "src/frontend/parsing/lexer.ml"| 1 -># 40 "src/frontend/parsing/lexer.mll"( RPAREN )# 2608 "src/frontend/parsing/lexer.ml"| 2 -># 41 "src/frontend/parsing/lexer.mll"( LBRACE )# 2613 "src/frontend/parsing/lexer.ml"| 3 -># 42 "src/frontend/parsing/lexer.mll"( RBRACE )# 2618 "src/frontend/parsing/lexer.ml"| 4 -># 43 "src/frontend/parsing/lexer.mll"( COMMA )# 2623 "src/frontend/parsing/lexer.ml"
Grammar
We use structure to reason about sentences - even if we don’t think about it. The words on their own don’t tell us much about the sentence - “use” is both a noun and verb - it’s only because we have a subject-verb-object pattern in “we use structure” can we infer that “use” is a verb. The same is true for compilers: The individual tokens x, +, y don’t mean much, but we can infer from x+y that x and y are numbers being added together.
We specify the structure of programs in Bolt using a grammar, which consists of a set of rules (productions) about how we can construct Bolt expressions.
For example, a program consists of a list of class definitions, following by some function definitions following by the main expression. This would look like this (using “X_defns” plural to informally refer to a list of “X_defn” ).
program class_defns function_defns main_expr
This top level rule also has rules for each of the expressions on the right hand side. Expressions that can be expanded further with rules are called non-terminals, and those that can’t i.e. the tokens are called terminals. Let’s look at the class_defn rule and main_expr rules.
A class definition consists of a CLASS keyword token (tokens are in UPPERCASE) followed by an ID token (identifier = the class name) and then the body is enclosed by braces. The body consists of capability definitions (this is Bolt-specific - used to prevent data races), field definitions and then method definitions. Here the CLASS, ID, LBRACE and RBRACE tokens are terminals, and the capability_defn, field_defns and method_defns expressions are non-terminals (they have their own rules expanding them).
class_defn CLASS ID LBRACE capability_defn field_defns method_defns RBRACE
A class definition that satisfies the rules:
class Foo { // Foo is the identifiercapability linear Bar; // capability definition (has its own rule)// field defnsvar int f : Bar; // (field has Bolt-specific capability annotatation)const bool g : Bar;//method defnsint getF() : Bar { // method definition (again has its own rule)this.f}}
And our main expression has the following rule:
main_expr TYPE_VOID MAIN LPAREN RPAREN block_expr
void main() {...}
Expressions can have multiple forms:
expr
| NEW ID LPAREN constructor_args RPAREN
| IF expr block_expr ELSE block_expr
| LET ID EQUAL expr
and so on.
Full details of Bolt’s grammar are in the appendix of my dissertation.
Abstract Syntax Trees
If we look at this grammar from another angle, this actually specifies a hierarchy on our program structure. At the top-level you have our program rule, and then we recursively expand out each of the terms on the right-hand-side of the rule (e.g. expand out the class definition using its rule, main expression using its rule etc.) until we end up with the tokens.
Which data structure represents hierarchies? Trees. So the grammar also specifies a syntax tree for our Bolt program, where tokens are the leaves.
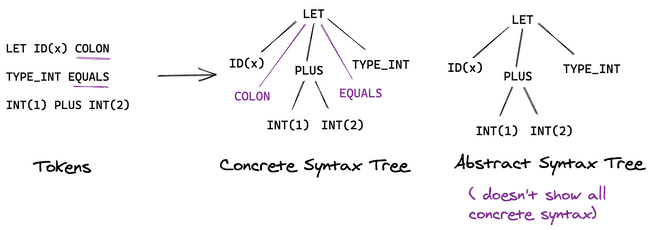
We could display all tokens on our tree (this would be a concrete syntax tree) but in practice not all tokens are useful. For example, in the expression let x : int = 1+2, you care about the ID token (variable x) and the expression 1+2 being assigned to the variable. We don’t need to represent the = token in our tree, as it doesn’t convey additional meaning (we already know we’re declaring a variable). By removing these unnecessary tokens, we end up with an abstract syntax tree (AST).
The goal of parsing is to construct an Abstract Syntax Tree from a Bolt program. The subsequent compiler stages then analyse and transform this parsed AST to form other intermediate ASTs.
Here we split the type definitions for our AST into two files:
ast_types.mli contains types common to all ASTs across the compiler.
(** Stores the line and position of the token *)type loc = Lexing.positiontype bin_op =| BinOpPlus| BinOpMinus| BinOpNotEqtype modifier = MConst (** Immutable *) | MVar (** Mutable *)(** An abstract type for identifiers *)module type ID = sigtype tval of_string : string -> tval to_string : t -> stringval ( = ) : t -> t -> boolendmodule Var_name : IDmodule Class_name : ID(** Define types of expressions in Bolt programs*)type type_expr =| TEInt| TEClass of Class_name.t| TEVoid| TEBool...
parsed_ast.mli contains the OCaml variant types for the class definitions, function defns and expressions, which are essentially a mapping of the grammar rules.
type expr =| Integer of loc * int...| Constructor of loc * Class_name.t * type_expr option * constructor_arg list(* optional type-parameter *)| Let of loc * type_expr option * Var_name.t * expr(* binds variable to expression (optional type annotation) *)| Assign of loc * identifier * expr| MethodApp of loc * Var_name.t * Method_name.t * expr list (* read as x.m(args) *)| If of loc * expr * block_expr * block_expr (* If ___ then ___ else ___ *)| BinOp of loc * bin_op * expr * expr...and block_expr = Block of loc * expr listtype class_defn =| TClass of Class_name.t * capability list* field_defn list* method_defn list...
Note Class_name.t, Var_name.t and Method_name.t used rather than just a string as these types give us more information.
Menhir
As with lexing, we could code this up by hand, but it would again get a lot more finicky as our language scales. We’re going to use the parser generator Menhir. Again as with the lexer, we have a parser.mly (note .mly extension) specification file.
We need to add Menhir to the Dune build file.
(menhir(modules parser))
Unlike with OCamllex, we also need to update our main Dune project build file to use Menhir:
(using menhir 2.0)
OCamllex and Menhir have a lot of parallels. We start with our optional OCaml header (here this just ignores the autogenerated parser file when calculating test coverage and opens the Ast_types and Parsed_ast modules):
%{[@@@coverage exclude_file]open Ast.Ast_typesopen Parsed_ast%}
We then specify the tokens we’d defined in OCamllex (OCamllex and Menhir work seamlessly together):
%token <int> INT%token <string> ID%token LPAREN%token RPAREN...
Specifying Production Signatures
Next, we specify the name of the top-level grammar production (here it is program):
%start program
We mentioned earlier that there was a mapping between OCaml variant types and the grammar productions, now we specify this, so Menhir knows what type to output when it generates the parser. This is done as a series of %type <ast_type> production_name:
%type <Parsed_ast.program> program/* Class defn types */%type <class_defn> class_defn...%type <Capability_name.t list> class_capability_annotations
Note, since we opened the Ast_types and Parsed_ast modules in the header, we can write Capability_name.t rather than Ast.Ast_types.Capability_name.t and class_defn instead of Parsed_ast.class_defn. However, we need to specify absolute types for the top-level production (Parsed_ast.program not just program) since this production is exposed in the parser.mli interface:
(* this file is autogenerated by Menhir *)val program: (Lexing.lexbuf -> token) -> Lexing.lexbuf -> (Parsed_ast.program)(* if we used program not Parsed_ast.program *)val program: (Lexing.lexbuf -> token) -> Lexing.lexbuf -> (program)(* now parser.mli doesn't know where to find program's type definition *)
Grammar Rules
Finally, we can specify our grammar rules, with the returned OCaml variant expression in {} after the rule. We can optionally separate each of the non-terminal/terminals that make up the right-hand-side of the rule with semicolons for readability. To use the result of an expanded non-terminal (e.g. the class_defn) in the OCaml expression, we can refer to it with a variable class_defns (in general the form is var_name=nonterminal expression).
program:| class_defns=list(class_defn); function_defns=list(function_defn); main= main_expr; EOF {Prog(class_defns, function_defns, main)}
Menhir provides a lot of small helper functions that make writing the parser easier. We’ve seen list(class_defn) - this returns the type Parsed_ast.class_defn list. There are other variants of this e.g. separated_list() and nonempty_list() and separated_nonempty_list():
params:| LPAREN; params=separated_list(COMMA,param); RPAREN {params}param_capability_annotations:| LBRACE; capability_names=separated_nonempty_list(COMMA,capability_name); RBRACE {capability_names}
Another useful function is option(). Here since let_type_annot returns an OCaml expression of type Parsed_ast.type_expr, option(let_type_annot) returns a value of type Parsed_ast.type_expr option - this is useful for cases where the user might optionally add type annotations. e.g. let x : int = 5 vs let x = 5.
Finally, Menhir also lets us get the line number and position of the production in the program (we’d defined the type loc for this), which is useful for error messages! You can decide from where to get the position: I chose to get the position at the start of the production using $startpos.
expr:| i=INT {Integer($startpos, i)}| TRUE { Boolean($startpos, true)}| FALSE { Boolean($startpos, false) }...| e1=expr op=bin_op e2=expr {BinOp($startpos, op, e1, e2)}| LET; var_name=ID; type_annot=option(let_type_annot); EQUAL; bound_expr=expr {Let($startpos, type_annot, Var_name.of_string var_name, bound_expr)}| id=identifier; COLONEQ; assigned_expr=expr {Assign($startpos, id, assigned_expr)}
Resolving ambiguous parses
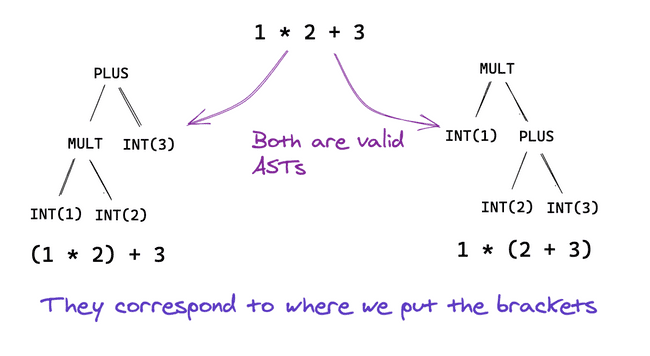
Sometimes our grammar can produce multiple abstract syntax trees, in which case we say it is ambiguous. The classic example is if we have the following grammar:
expr | INT | expr PLUS expr | expr MULT expr
If we try to build this grammar with Menhir, then we get the following error message (the numbers aren’t important, Bolt has many more operators than just + and - ):
menhir src/frontend/parsing/parser.{ml,mli}Warning: 17 states have shift/reduce conflicts.Warning: 187 shift/reduce conflicts were arbitrarily resolved.
Arbitrarily resolved isn’t good! This means it’ll randomly pick one, even if it’s not the one we want. To fix this we have two options
- Rewrite the grammar to be unambiguous.
- Keep the ambiguity but tell Menhir how to resolve it.
I had initially chosen option 1 for Bolt. It is possible to do this for small grammars but this becomes harder as your language gets bigger. The main disadvantage is that you have to put extra parentheses around Bolt expressions to disambiguate parses, which really isn’t a good experience.
When writing this post, I looked at the OCaml compiler for inspiration (it too uses Menhir!) and the Menhir docs. Option 2 offers a better solution, but first we need to understand how Menhir works.
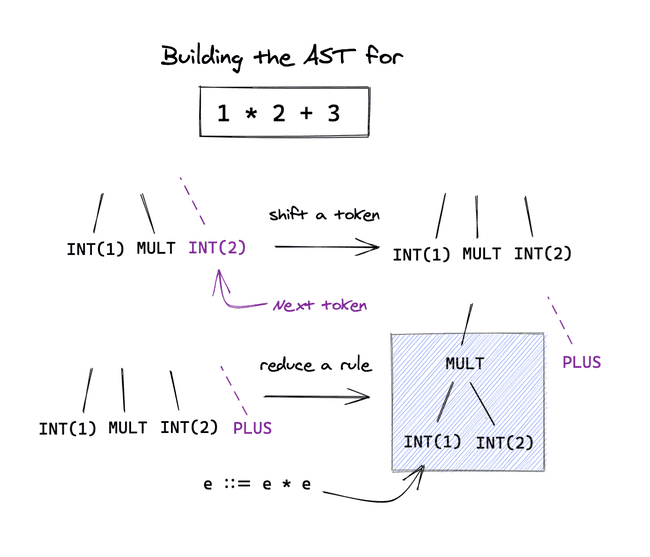
Menhir is a shift-reduce parser. It builds our AST bottom-up, deciding based on the next token whether to reduce the current stack of non-terminals and terminals (i.e. it matches the right-hand-side of a production rule, so reduce it to the left-hand-side) or to shift another token onto the stack.
A shift-reduce conflict occurs when it could do both and end up with a valid AST in either case. Menhir lets us manually specify which action to take in the form <action> token whether the action is:
%left: reduce%right: shift%nonassoc: raise a SyntaxError
If you’re not sure which one to choose, you have a secret weapon!
Running menhir src/frontend/parsing/parser.mly --explain will generate an explanation in a parser.conflicts file, which gives an in-depth explanation as to where the conflict is!
This is only part of the story - we want to specify that multiplication takes precedence over addition. We can do this by specifying an ordering on the actions, from lowest priority to highest. Then when there are multiple rules, Menhir will choose the one with the highest priority - it will reduce the multiplication before the addition in our example, giving us the right AST:
%right COLONEQ EQUAL%left PLUS MINUS%left MULT DIV REM%nonassoc EXCLAMATION_MARK
So we’re done right? Not quite. If we have multiple binary operators, we’d write this grammar instead as:
expr | INT | expr binop expr
binop | PLUS | MINUS | MULT | DIV | REM | …
After following the steps outlined, you might still get the following error:
Warning: the precedence level assigned to PLUS is never useful.
Or that you still have shift-reduce conflicts, even though you’ve resolved them all. What’s gone wrong?
See I said this precedence works if there are multiple rules, not if there is one production. Here we just have the one (expr binop expr). What we want is one rule for each of the operators (expr PLUS expr) (expr MULT expr) etc. Menhir’s got you covered - just add an %inline keyword. This expands all the uses of bin_op below to one rule per variant:
%inline bin_op:| PLUS { BinOpPlus }| MINUS { BinOpMinus }| MULT { BinOpMult }...
Et voila, we’re done! No more shift-reduce conflicts.
Putting the Lexer and Parser together
Right, let’s wrap up the src/parsing folder of the Bolt repository by talking about how we’d put this all together. What we want is the following:
(** Given a lex buffer to read a bolt program from, parse theprogram and return the AST if successful *)val parse_program : Lexing.lexbuf -> Parsed_ast.program Or_error.t
To do that, we’ll need to use the Lexer and Parser modules generated by OCamllex and Menhir from our lexer.mll and parser.mly files. Specifically we care about the two functions:
val Lexer.read_token: Lexing.lexbuf -> tokenval Parser.program: (Lexing.lexbuf -> token) -> Lexing.lexbuf-> (Parsed_ast.program)
These functions can throw exceptions. It is hard to track which functions throw exceptions, so we instead catch the exception and instead use a Result monad (don’t be scared!) which has two possible options - Ok something or Error e. Then you can tell from the function signature Or_error.t that it could return an error.
(* Prints the line number and character number where the error occurred.*)let print_error_position lexbuf =let pos = lexbuf.lex_curr_p inFmt.str "Line:%d Position:%d" pos.pos_lnum (pos.pos_cnum - pos.pos_bol + 1)let parse_program lexbuf =try Ok (Parser.program Lexer.read_token lexbuf) with(* catch exception and turn into Error *)| SyntaxError msg ->let error_msg = Fmt.str "%s: %s@." (print_error_position lexbuf) msg inError (Error.of_string error_msg)| Parser.Error ->let error_msg = Fmt.str "%s: syntax error@." (print_error_position lexbuf) inError (Error.of_string error_msg)let pprint_parsed_ast ppf (prog : Parsed_ast.program) =Pprint_past.pprint_program ppf prog
This file also exposes the pretty-print function for the parsed AST in the library (pprint_past.ml). This is useful for debugging or expect tests (as this clip of an early version of Bolt demonstrates):
Where does this fit in the Bolt pipeline?
This is the first stage of the frontend, which can be seen in the compile_program_ir function.
let compile_program_ir ?(should_pprint_past = false) ?(should_pprint_tast = false)?(should_pprint_dast = false) ?(should_pprint_drast = false)?(should_pprint_fir = false) ?(ignore_data_races = false) ?compile_out_file lexbuf =let open Result inparse_program lexbuf>>= maybe_pprint_ast should_pprint_past pprint_parsed_ast>>= ...
I still haven’t told you where the lexbuf comes from. You can either get it from an input channel, as in the main function, which reads in a Bolt file from the command line:
In_channel.with_file filename ~f:(fun file_ic ->let lexbuf =Lexing.from_channel file_ic(*Create a lex buffer from the file to read in tokens *) incompile_program_ir lexbuf ...
Or, as in the tests (tests/frontend/expect), you can read from a string using (Lexing.from_string input_str).
Summary
This wraps up the discussion of the lexer and parser. If you haven’t already, fork the Bolt repo.
All the code linked in this post is in the src/frontend/parsing folder, plus some extra rules in the grammar to cover data-race freedom using capabilities (as discussed in my dissertation) and also inheritance and generics.
Sounds exciting? Next up, we’ll talk type-checking and even implement a form of local type inference. The post’ll be out within the next week, and if you enjoyed this post, I’m sure you’ll love the next one! I’ll explain how to read typing rules () and how to implement the type checker for the core language.


